Turn your pages into interactive applications! JavaScript Mini-Apps (Input & Output, no persistent state)

I have been playing around with making JavaScript ‘mini-apps’ in Logseq.

There is no persistent storage, so think of these are more like utilities that could help you in your day to day life.

The cool thing about this is that they can run within the standard Logseq app.

Here is a basic example, you could use this to make anything. Not sure if it works on mobile.

To use the ‘mini-apps’, just run the macro, for example the macro below generates the ‘mini-app’ in the screenshot below.

- {{convert-epoch-to-datetime-string-html-io}}

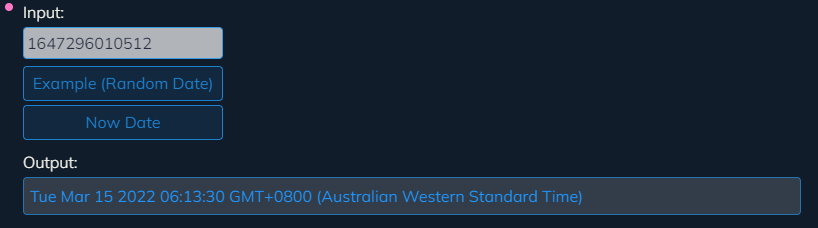
These are little JavaScript + HTML “pages” that can contain entire user interfaces, with user inputs and buttons!

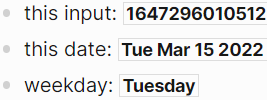
I made a basic example below, it takes an input in the form of the Unix epoch time in seconds or milliseconds and converts that date into something human readable.

You can use the buttons to generate a random date, or the now date if you prefer.

The output field is actually an input field that will automatically select the output/result text when you enter you cursor, this lets you quickly use these ‘mini-apps’ / ‘utilities’ to generate output/content and then quickly copy that text for other uses.

To Install:

Add this as your first ‘mini-app’ in your config.edn

:macros
{:convert-epoch-to-datetime-string-html-io
 "<style onload='Function(this.innerHTML.slice(2, this.innerHTML.length - 2))()'>/*

 function getRandomInt(min, max) {
    min = Math.ceil(min);
    max = Math.floor(max);
    return Math.floor(Math.random() * (max - min + 1)) + min;
  }

  function convertEpochDateToDateString(epochDate) {
    if (String(epochDate).length <= 10) {
      epochDate = epochDate * 1000;
    }
    var d = new Date(parseInt(epochDate));
    return d.toString();
  }

  const source = document.getElementById('convert-epoch-to-datetime-string-text-input');
  const result = document.getElementById('convert-epoch-to-datetime-string-output');

  const inputHandler = function(e) {
    var dateString = convertEpochDateToDateString(e.target.value);
    result.innerHTML = dateString;
  }

  document.getElementById('convert-epoch-to-datetime-string-example-button').onclick = function(e) {
    e.preventDefault();
    var min = 0;
    var max = new Date().getTime();
    var randNum = getRandomInt(min, max);
    source.value = randNum;

    var dateString = convertEpochDateToDateString(randNum);
    result.value = dateString;
  }

  document.getElementById('convert-epoch-to-datetime-string-now-date-button').onclick = function(e) {
    e.preventDefault();
    var nowDate = new Date().getTime();
    source.value = nowDate;
    var dateString = convertEpochDateToDateString(nowDate);
    result.value = dateString;
  }

  source.addEventListener('input', inputHandler);

  */</style>
<div class='js-mini-app-container'>
  <div class='js-mini-app-input-container'>
    <div class='js-mini-app-label-container js-mini-app-input-label-container'>
      <label for='convert-epoch-to-datetime-string-text-input' class='js-mini-app-label js-mini-app-input-label'>Input:</label>
    </div>
    <input id='convert-epoch-to-datetime-string-text-input' class='js-mini-app-input convert-epoch-to-datetime-string-input'>
    <button id='convert-epoch-to-datetime-string-example-button' class='js-mini-app-button'>Example (Random Date)</button>
    <button id='convert-epoch-to-datetime-string-now-date-button' class='js-mini-app-button'>Now Date</button>
  </div>
  <div class='js-mini-app-output-container'>
    <div class='js-mini-app-label-container js-mini-app-output-label-container'>
      <label for='convert-epoch-to-datetime-string-output' class='js-mini-app-label js-mini-app-output-label'>Output:</label>
    </div>
    <input onfocus=\"this.select();\" onmouseup=\"return false;\" id='convert-epoch-to-datetime-string-output' class='js-mini-app-output convert-epoch-to-datetime-string-output'>
  </div>
</div>"}

Add these CSS styles to your custom.css

/*********************************
****
**** mini js apps (config macros)
****
****/

/**** Generic ****/

.js-mini-app-container {
  display: grid;
}
.js-mini-app-container div {
  display: grid;
}
.js-mini-app-input-container {

}
.js-mini-app-output-container {
  margin-top: 10px;
}
.js-mini-app-label-container {
  margin-bottom: 3px;
}

.js-mini-app-input {
  width: 200px;
  color: rgb(20 30 50 / 90%);
  background-color: rgb(245 245 245 / 70%);
  padding: 3px;
  border: 1px solid rgb(30 150 240 / 80%);
  border-radius: 4px;
  margin-bottom: 3px;
}
.js-mini-app-output {
  width: 200px;
  height: 38px;
  color: rgb(30 150 255 / 100%);
  background-color: rgb(245 245 245 / 15%);
  padding: 6px;
  border: 1px solid rgb(30 150 240 / 60%);
  border-radius: 4px;
}
.js-mini-app-button {
  width: 120px;
  height: 35px;
  margin-top: 4px;
  color: rgb(30 150 240 / 80%);
  background-color: rgb(30 150 240 / 10%);
  border: 1px solid rgb(30 150 240 / 80%);
  border-radius: 4px;
}
.js-mini-app-button:hover {
  color: rgb(30 150 240 / 60%);
  background-color: rgb(30 150 240 / 4%);
  border: 1px solid rgb(30 150 240 / 60%);
}

/**** convert-epoch-to-datetime-string-html-io ****/

.convert-epoch-to-datetime-string-input {

}
.convert-epoch-to-datetime-string-output {
  height: 38px;
  min-width: 200px;
  width: 100%;
}
#convert-epoch-to-datetime-string-example-button,
#convert-epoch-to-datetime-string-now-date-button {
  width: 200px;
}

Now you should be able to use the macro {{convert-epoch-to-datetime-string-html-io}} in your pages.

That is it!

All that was needed was the macro defined in config.edn and some CSS styles, and you can fill up your Logseq graph with whatever marvelous utilities you can imagine.

Let me know how you go.

I like this as a quick way to make little handy utilities.


Further reading and Notes

The magic that lets you run JavaScript this way are these lines (see the macro above and see how the JavaScript is contained within them):

 <style onload='Function(this.innerHTML.slice(2, this.innerHTML.length - 2))()'>/*
 /* JavaScript goes here... */
 */</style>

I got this trick from this link: https://github.com/71/logseq-snippets

That links goes into more complicated stuff, for example, combining this with persistent storage!

That’s very cool! Have you thought about other use cases since then?

Thanks a lot, that’s grate! @drawingthesun
I’ll check it out and play with it! Bravo!

This does not seem to work anymore, can others confirm? the button click events are not wired up.

Doesn’t work for me either. JS doesn’t seem to be evaluated at all inside the style tag.

It works by moving the js code from config.edn to custom.js, plus a few modifications (mind that I have maintained the code style, which is not of the highest quality).

  • This is what remains in config.edn:
:macros {

:convert-epoch-to-datetime-string-html-io
 "<div class='js-mini-app-container'>
  <div class='js-mini-app-input-container'>
    <div class='js-mini-app-label-container js-mini-app-input-label-container'>
      <label for='convert-epoch-to-datetime-string-text-input' class='js-mini-app-label js-mini-app-input-label'>Input:</label>
    </div>
    <input id='convert-epoch-to-datetime-string-text-input' class='js-mini-app-input convert-epoch-to-datetime-string-input'>
    <button id='convert-epoch-to-datetime-string-example-button' class='js-mini-app-button'>Example (Random Date)</button>
    <button id='convert-epoch-to-datetime-string-now-date-button' class='js-mini-app-button'>Now Date</button>
  </div>
  <div class='js-mini-app-output-container'>
    <div class='js-mini-app-label-container js-mini-app-output-label-container'>
      <label for='convert-epoch-to-datetime-string-output' class='js-mini-app-label js-mini-app-output-label'>Output:</label>
    </div>
    <input onfocus=\"this.select();\" onmouseup=\"return false;\" id='convert-epoch-to-datetime-string-output' class='js-mini-app-output convert-epoch-to-datetime-string-output'>
  </div>
</div>"

}
  • This is what goes into custom.js:
function getRandomInt(min, max) {
    min = Math.ceil(min);
    max = Math.floor(max);
    return Math.floor(Math.random() * (max - min + 1)) + min;
}

function convertEpochDateToDateString(epochDate) {
    if (String(epochDate).length <= 10) {
        epochDate = epochDate * 1000;
    }
    var d = new Date(parseInt(epochDate));
    return d.toString();
}

function applyMiniAppCode(container){
  const btnExample = container.querySelector('#convert-epoch-to-datetime-string-example-button');
  const btnNowDate = container.querySelector('#convert-epoch-to-datetime-string-now-date-button');
  const source = container.querySelector('#convert-epoch-to-datetime-string-text-input');
  const result = container.querySelector('#convert-epoch-to-datetime-string-output');

  btnExample.onclick = function(e) {
    e.preventDefault();
    var min = 0;
    var max = new Date().getTime();
    var randNum = getRandomInt(min, max);
    source.value = randNum;

    var dateString = convertEpochDateToDateString(randNum);
    result.value = dateString;
  }

  btnNowDate.onclick = function(e) {
    e.preventDefault();
    var nowDate = new Date().getTime();
    source.value = nowDate;
    var dateString = convertEpochDateToDateString(nowDate);
    result.value = dateString;
  }

  const inputHandler = function(e) {
    var dateString = convertEpochDateToDateString(e.target.value);
    result.innerHTML = dateString;
  }

  source.addEventListener('input', inputHandler);
}

const miniAppObserver = new MutationObserver(() => {
    document.querySelectorAll("div.js-mini-app-container").forEach(applyMiniAppCode);
});

miniAppObserver.observe(document.getElementById("main-content-container"), {
    attributes: true,
    subtree: true,
    attributeFilter: ["class"],
});

No other changes in the opening post:

  • The css styles remain the same.
  • The macro usage remains {{convert-epoch-to-datetime-string-html-io}}
1 Like

It is now preferable to turn this into a kit, like this:

  • Move the mini-app code from custom.js to a javascript code-block in a page of Logseq itself (e.g. MyMiniApp).
  • Delete the observer miniAppObserver.
  • Rename the entry function (here applyMiniAppCode) to the page’s name (e.g. myminiapp).
  • Wrap the macro’s html with an outer <div class='kit' data-kit='myminiapp'>
  • Ensure kits’ code is inside custom.js.
2 Likes

I am bit skeptical that all these variations of MutationObserver will slow down Logseq’s performance even more down than it already is without any Plugin/API development. Its DOM is large and watching class attribute changes with a followed search via querySelectorAll seems expensive for local-scoped actions like simple buttons. I justed added a console.log to the observer method and counted its execution times with Devtools, which is very often in vague terms.

What I am questioning here is:
Is there currently really no way to trigger event handlers onclick, onload etc. for HTML elements like button by just using Logseq editor, not needing to watch nearly the whole DOM? Something similar to OP, creating a new block with:

<button onclick='logseq.api.show_msg("Hello world")'>Click me</button>

Or:

@@html: <button onload='Function("logseq.myns.foo()")()'>Click me</button>@@

I also tried to embed this in a macro, all without success. The button is displayed, but all JavaScript seems to be suppressed. If this is part of some HTML sanitation process by Logseq, developers should provide a flag to opt out of this security feature for a specific element.

2 Likes

Rightly so. Thank you for your observation. In kits I have replaced querySelectorAll with an one-time “live” getElementsByClassName. Moreover:

  • Only a single observer is created for all the macros, as they all share the same class.
  • Unless you see an actual difference by enabling/disabling your custom.js, there is something else to blame for the delay.

You may open a feature request about this.

1 Like

I had to stop updating Logseq due to issues where something would break my original implementation and knock out all my custom functionality in my graph. I might consider updating when I have the time to fix any issues, however what @mentaloid posted in their reply might be the better way to go in the future. Their implementation seems more efficient and also has a better architecture where some portion of the javascript can be run from normal Logseq blocks rather than everything being between the two files config.edn and custom.js

Your implementation is really clever, I like it a lot.

Mine is quite clumsy in that all of the html and javascript existed in two files config.edn and custom.js, where mistakes in the code could render the entire config corrupt. Also I have very little code reuse in my graph outside of a small amount of general js functions, but each mini-app required their own chunks of html and javascript where much of the functionality was being repeated.

In comparison your implementation is built around an engine which requires no ongoing changes, the user can now use that engine to make their mini-apps on the fly in normal Logseq blocks.

I really like this.

At some point I will try moving some of my mini apps over to your engine and see how it goes. I feel that your architecture is much more future proof and likely the way forwards for those of us that want to be able to extend Logseq with various mini-apps when needed.

1 Like

Thank you, good observations. I have bigger ambitions, so I needed a generic engine. I’m confident that all your mini apps can be turned into kits. If you face any difficulties, I’m willing to help, even adapting the engine if needed.

1 Like

With Synthesis lab - Natural-language programming this is possible as easily as typing this:

- this input: {{cell}}
- this date: {{cell date from this input}}

also possible to continue from there, e.g.:

- weekday: {{cell the weekday for number (the day of this date) }}

image