We’re on the home stretch! By now, you have all the knowledge to build increasingly complex note indexes and workflows.
In this lesson, we look at some of the other filter options in Logseq. Because not only can we use Boolean operators as filters and [[links]] as search terms, but it’s also possible to describe blocks and pages in other ways. Enter properties.
Properties are best thought of as metadata, or data about data. We can finely tune our search results by using properties in our queries.
For example, there’s a property that tells what page a block is on. Other properties tell us when a page was created or updated. But apart from these built-in properties, we can even create our own data structure using custom properties. Properties enable us to build powerful workflows, as we’ll see next week.
This lesson will be more like a reference guide than a step-by-step tutorial. That’s why there’s no exercise. Instead, look at what parts interest you and experiment with your own graph.
Next week, we’ll draw heavily from this guide and expand it based on your feedback. So, leave your questions and comments in this forum thread.
What are Logseq properties?
As per the official documentation, “properties are key-value pairs that allow you to annotate a block or page.”
If you’re unfamiliar with the term key-value pair, the easiest way to explain it is with a real-life example.
We humans have many different characteristics. The colors of our eyes, hair, and skin can all be characteristics that we can express in properties. My properties would be something like this in Logseq’s property syntax:
hair-color:: black
eye-color:: darkbrown
skin-color:: pink
The key part is a broad category, whereas the value is a subcategory or can even be a unique value.
The key is always followed by two colons (::), with no space between the key and the colons.
The value can be a single value or a list separated by commas:
key:: value 1, value 2, value 3
The key-value pairs above are an example of custom properties, which are always visible. But there is another category of properties, namely the ones that are hidden.
Hidden properties
Whenever you create a block or page in Logseq, several hidden properties (metadata) are also created. Information like when a block or page is created (created-at), when it’s updated (updated-at), what its parent block is (parent), and many other properties.
Visible properties
Visible properties are the ones we can edit. The built-in property we’ll use the most is tags, although alias can also come in handy when we want to save ourselves some typing.
We’ll cover the visible properties in-depth in the “Create your own properties” section of this lesson.
Now that we understand the basics of properties, let’s see some of the query filters we can use with them.
Time and date-specific filters
An important component of our knowledge work is time. In Logseq, time plays a crucial role with the Journals pages.
Logseq has several query filters that work with built-in properties. The most important date-specific filters are sort-by and between.
sort-by
The sort-by filter lets us filter pages based on the hidden created-at and updated-at properties. It doesn’t actually filter results out; it only orders the results based on our chosen characteristic.
Currently, the sort-by only works when searching for pages, not blocks. The reason the created-at and updated-at properties are not added to individual blocks is due to performance. We might solve this in the future, but for now, keep in mind that sort-by only works with pages.
The syntax for the sort-by filter is as follows:
(sort-by key order)
First, we tell the Logseq query what filter we want to use, sort-by in this case. Then, we tell it what key we want to filter on (either created-at or updated-at). Finally, we give in the order we want to filter the values (desc or asc).
The sort order is by default set to descending (from newest to oldest). Because desc is the default value, you can leave it out from the filter if you want:
(sort-by created-at)
To show the results from oldest to newest, you have to set the sort order to asc (for ascending):
(sort-by created-at asc)
In proper Logseq syntax, this is what a sort-by query looks like:
{{query (and [[Search term]] (sort-by created-at asc)) }}
between
Apart from being a place to jot down our notes quickly, the journals page enables us to search our notes based on date.
The between filter allows us to look for blocks located on journal pages between two specific dates. The between filter supports a wide range of natural and logical language, which are basically dynamic variables (more on that at the end of this lesson).
The syntax for the between filter is as follows:
(between start end)
We can use natural language (English), plus and minus symbols, and numbers for the start and end dates. These are all the supported values, which can be used in combination if you wish:
nowtodayyesterdaytomorrow+-y(for years)m(for months)w(for weeks)d(for days)h(for hours)min(for minutes)- any numbers
- any date links
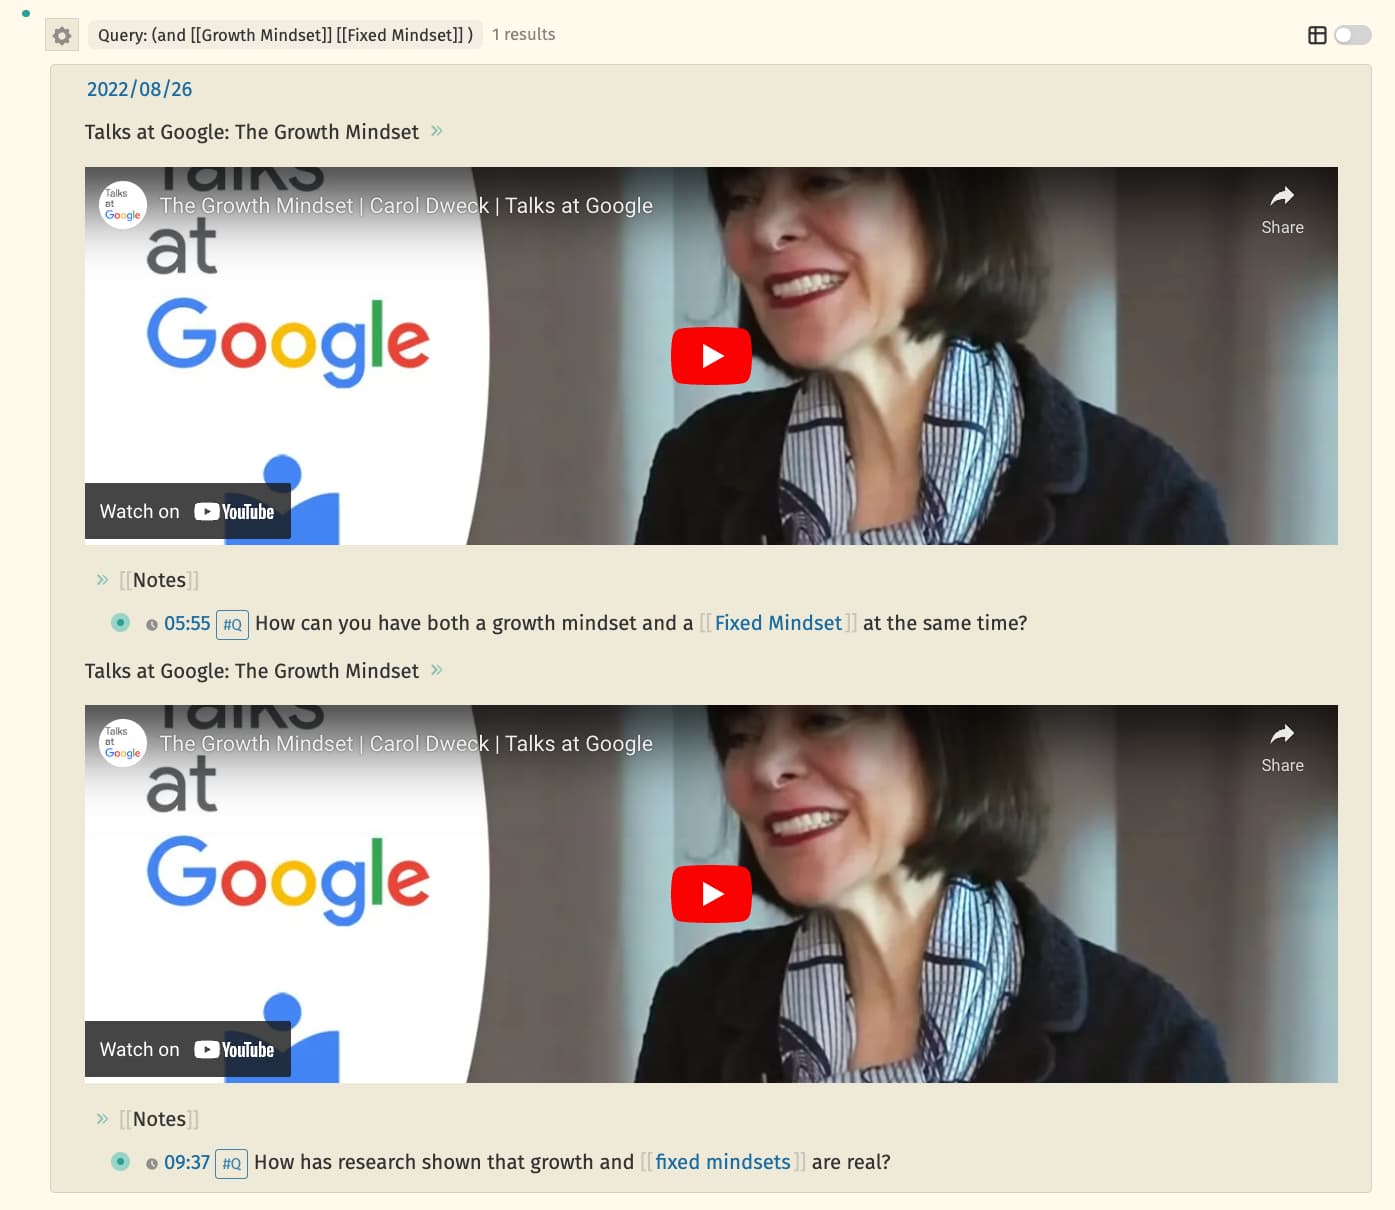
For example, this query looks for all blocks or branches that contain [[Search term]] and that are on a journals page between one week ago and now:
{{query (and [[Search term]] (between -7d now)) }}
Apart from relative numbers, you can also put in absolute dates like this:
{{query (and [[Search term]] (between [[Aug 19th, 2022]] [[Aug 26th, 2022]])) }}
(to see the full query, scroll to the right)
The flexibility of the between filter helps us with project planning and reviews. The dynamic variables allow us to write a query once and reuse it indefinitely.
Create your own properties
Apart from writing in an outline and adding links to individual blocks, we can create a more elaborate data structure in Logseq.
Using page tags and (page) properties, you can power your workflows without cluttering the text of your note with a bunch of links.
In this section, we see how to make a start with creating properties to power our queries. This is a big topic, so we’ll only scratch the surface. Next week we’ll use custom properties extensively as we build our workflows.
page-tags
The built-in tags property lets us add tags that apply to an entire page. To add a tags property, write the following in the first block of a page:
tags::
Whenever you place a property in the first block of a page, you make that property a page property. The other page property you’ll see a lot is title, which gets automatically added to a page when you create it. To ensure a property you add is a page property, add it in the same block where you see the title:: key.
The tags property is a special type of page property as it’s built-in, so it has its own filter:
{{query (page-tags Philosophy) }}
The example above looks for all pages that contain tags:: Philosophy in the first block.
page-property
While the tags property helps to categorize pages, you sometimes want to add more unique characteristics to a page. This is where custom page properties come in handy.
A page property is any key-value pair that’s not built-in, and that’s placed in the first block of a page. The syntax is the same as the built-in properties:
custom-property:: value
The page-property filter allows us to search for custom properties and any specific value we’d like. The syntax is as follows:
(page-property key value)
For example, let’s say we use Logseq to write articles and add an article-status:: property to any article page. The possible values are idea, outline, draft, edit, and published.
To create an index of all articles in status:: idea, we write the following query:
{{query (page-property status idea) }}
To get an overview of all articles in status draft, we’d write this query:
{{query (page-property status draft) }}
But what if you primarily work with blocks and branches instead of pages? That’s where block properties come in.
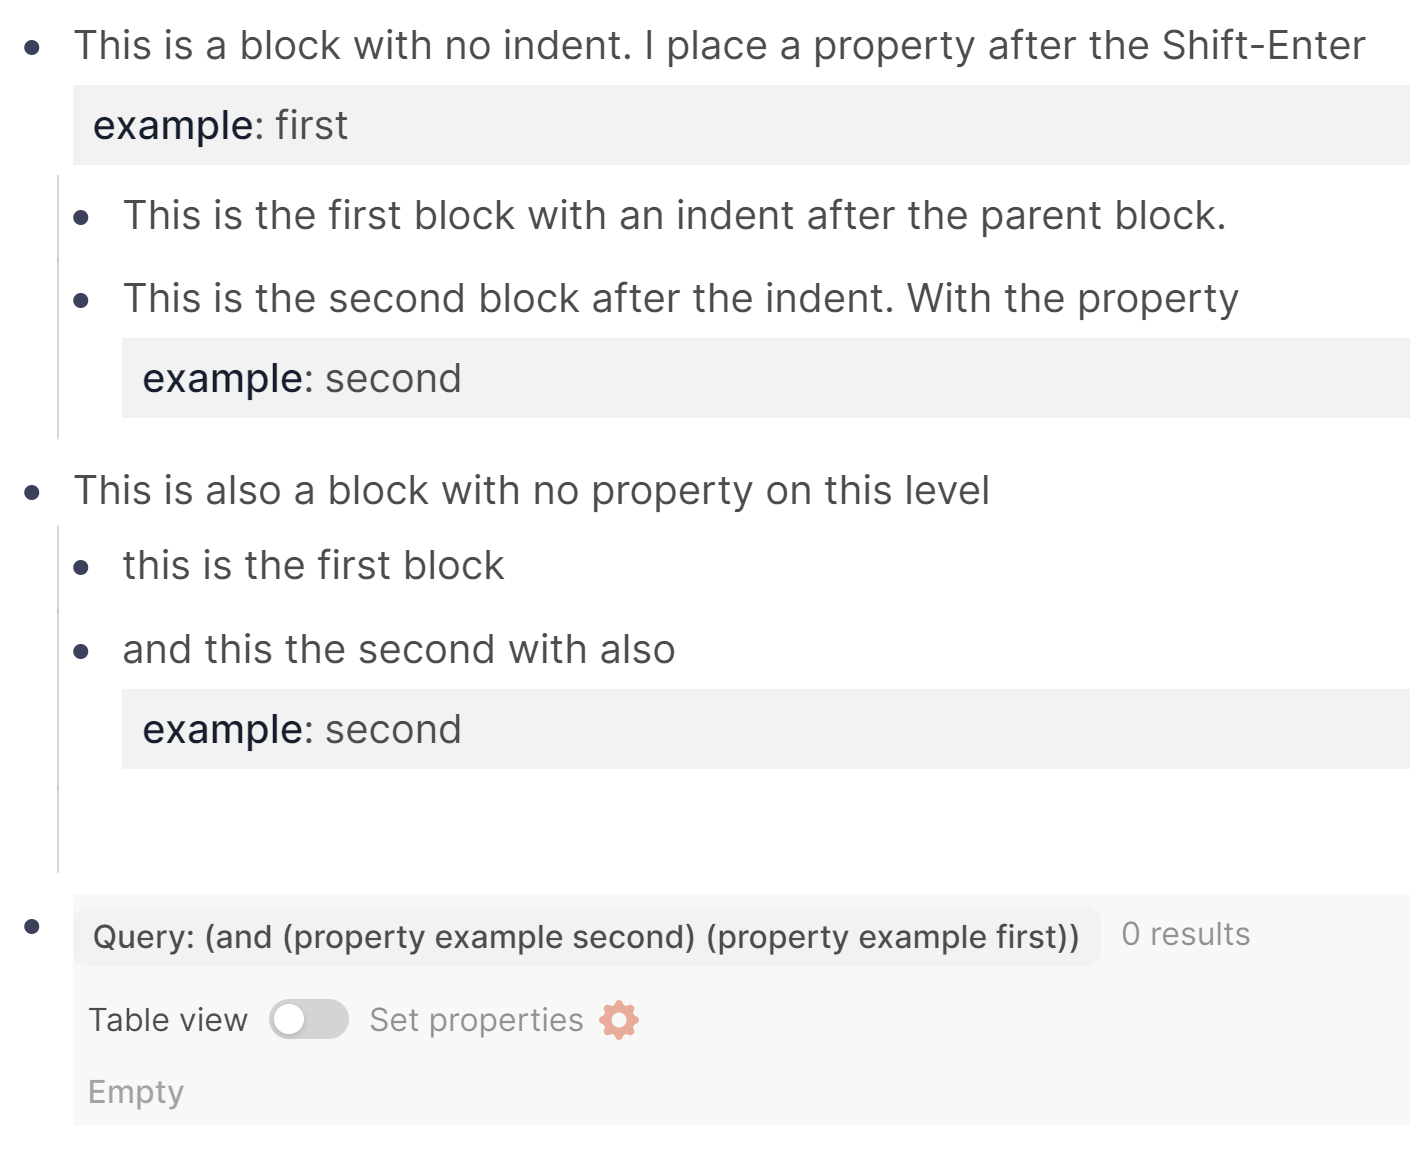
property
A block property is much like a page property. But instead of adding the property to the first block of a page, block properties are within blocks that contain other content (like notes). Block properties only apply to the block itself, not to its children.
To add a property to a block, place your cursor at the end of a block’s content and press Shift-Enter. This creates a new line inside the block. Next, you type the property as you would otherwise.
Here’s an example of a block property:
This is a block that contains content. On the new line below is a
statusproperty that provides metadata to this block.
status:: outline
The syntax to search for a custom property is as follows:
(property key value)
That’s basically the same as the page-property filter! The query would look like this:
{{query (property status idea) }}
Custom properties enable us to build workflows with Logseq. Next week we’ll use them extensively to build workflows to create and learn from content.
Dynamic variables
We end this lesson by taking a brief look at dynamic variables. In the time and date-specific filters section, you already saw the dynamic values you could use for dates. But a few more dynamic variables can come in handy, mainly when used outside of the between filter.
The dynamic variables we can use in templates also work in macros like queries. The syntax for dynamic variables is as follows:
<% variable %>
[Here are some examples of dynamic variables we can use in queries]:
<% today %><% yesterday %><% tomorrow %><% current page %><% Last Friday %>
What happens when you put a dynamic variable in a query? When Logseq sees a variable, it interprets it and turns it into a [[link]].
As an example, say we add this query on a page titled Philosophy:
{{query (and [[Notes]] <% current page %>) }}
Logseq will interpret this as:
{{query (and [[Notes]] [[Philosophy]]) }}
You can see that Logseq turns dynamic variables into links when you add one to a template. In that case, the variable will be turned into an actual link upon running the template.
Next: let’s build with queries!
That was a lot of information! You should be proud of yourself for getting so far.
For now, spend some time reviewing your notes and asking any questions in today’s forum thread. After the weekend, we kick off the build week with another live lecture. Click here to set a reminder for yourself on YouTube.